Django is an incredibly versatile framework that enables developers to create web applications quickly and easily. One of the useful features that Django provides is the ability to display flash messages on the webpage. Flash messages are brief notifications that can inform users of successful or unsuccessful actions, such as a form submission or a login attempt.
By learning how to use flash messages in Django, you can enhance the user experience of your web application and provide valuable feedback to your users. This can help to improve user satisfaction, increase engagement, and ultimately make your web application more successful.
Let’s dive in and start building a Django web application to display flash messages!
Step 1: Creating a Django Project
- First, you need to create a new Django Project. Follow the tutorial on How to Create Hello World Website App in Django.
- Create a new Djanog project with the name flash_message, use the following command in your terminal or command prompt.
> django-admin startproject flash_message
- After creating a new Django project, the next step is to create a new app within the project. To create a new app with the name myapp, you can use the following command in your terminal or command prompt:
> cd flash_message
> python manage.py startapp myapp
Step 2: Configuring Your Django Project for Flash Messages
- To add your new myapp app to the list of installed apps, follow these steps:
- Open the settings.py file located in the flash_message directory of your project.
- Find the INSTALLED_APPS variable, which is a list of all the apps that are currently installed in your project.
- Add the name of your myapp app to the end of the list, like below and save the file.
INSTALLED_APPS = [
   # other installed apps...
   'myapp',
]
- Open flash_message/urls.py and add code inside urlpatterns = [] as shown below.
# flash_message /urls.py

from django.contrib import admin
from django.urls import path, include  # new

urlpatterns = [
    path("admin/", admin.site.urls),
    path("", include("myapp.urls")),  # new
]
Step 3: Creating URL Patterns for Your Django App
You need to create a new file called urls.py in your myapp directory and add some code to it. This file will define the URL patterns for your app and specify the views that should be rendered when those URLs are requested.
To create a new urls.py file in your myapp directory, follow these steps:
- Open the myapp directory located in the flash_message directory of your project.
- Create a new file called urls.py. The full path for this file should be flash_message/myapp/urls.py.
- Copy the following code and paste it into the new urls.py file and save it.
# myapp/urls.py
from django.urls import path
from myapp import views

urlpatterns = [
    path("", views.index, name="index"),
]
Step 4: Enabling Flash Messages in Your Django App
- Open myapp/views.py file. To use flash message, add from django.contrib import messages. The views.py file will look like the below code.
# myapp/views.py
from django.shortcuts import render
from django.contrib import messages
- Create a new view index() with the following code in views.py file.
# myapp/views.py

--snip--

def index(request):
    messages.success(request, 'This is success flash message!')
    messages.info(request, 'This is info flash message!')
    messages.warning(request, 'This is warning flash message!')
    messages.error(request, 'This is error flash message!')

    return render(request, "myapp/index.html")
- To define the messages constant in your app, you can add the following code snippet to your flash_message/settings.py file:
try:
    from django.contrib.messages import constants as messages
    MESSAGE_TAGS = {
        messages.SUCCESS: 'alert-success',
        messages.DEBUG: 'alert-info',
        messages.INFO: 'alert-info',
        messages.WARNING: 'alert-warning',
        messages.ERROR: 'alert-danger',
    }
except Exception as e:
    pass
- As you can see, we have used index.html template. So, we need to create this template file in our application.
Step 5: Add HTML Template to the Application
- First, we need to create a directory to put the index.html file.
- Create new directory templates under your app directory myapp. Under this newly created template directory, create one more directory with the name myapp similar to your app name.
- After creating both directories, the final path will look flash_message\myapp\templates\myapp.
- We have created these directories, but Django doesn’t know about them. So, we need to tell Django that we have created a new template directory. To do this, open flash_message/settings.py file. Find a block of code that starts with the name TEMPLATES. You can see ‘DIRS’: [], is blank.
- Add code BASE_DIR / ‘templates’ inside square brackets. The final code will look like this:
TEMPLATES = [
    {
        'BACKEND': 'django.template.backends.django.DjangoTemplates',
        'DIRS': [BASE_DIR / 'templates'],
         # other code ...

]
- Create an HTML file index.html under flash_message\myapp\templates\myapp and add the following code.
<!DOCTYPE html>
<head>
    <title>Flash Message Demo</title>
    <link href="https://netdna.bootstrapcdn.com/bootstrap/3.3.5/css/bootstrap.min.css" rel="stylesheet">
    <script src="https://cdnjs.cloudflare.com/ajax/libs/jquery/3.2.1/jquery.min.js"></script>
    <script src="https://netdna.bootstrapcdn.com/bootstrap/3.3.5/js/bootstrap.min.js"></script>
</head>
<body>

    <h2>Flash Messages in Django</h2><br>

    {% if messages %}
        {% for msg in messages %}
            <div class="alert {{msg.tags}}" role="alert">{{ msg | safe}}</div>
        {% endfor %}
    {% endif %}
</body>
</html>
Note: When working with flash messages in Django, it’s important to use loops to access messages in both your templates and views. If you don’t use loops, then messages will reside and will show on the next run.
Step 6: Running the Project
After making changes to your Django project and app, you can now test whether flash messages are working properly., save all changes and run the project by following the command in the terminal/command prompt.
> python manage.py runserver
Open your browser and navigate to http://127.0.0.1:8000.
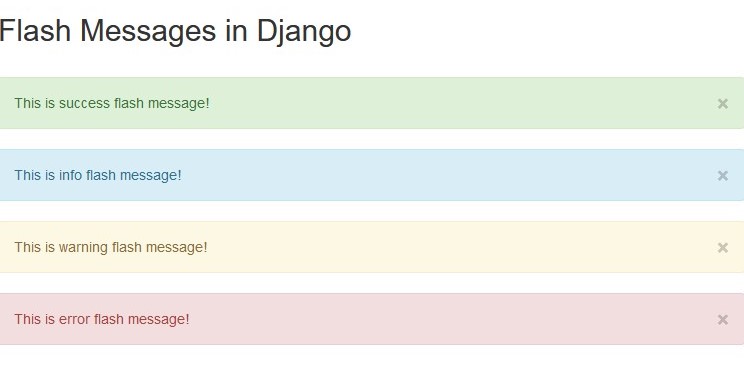
If everything is set up correctly, you should see the below page.


