In modern web development, responsiveness and scalability are key factors in building successful applications. Asynchronous task processing plays a vital role in achieving these goals, allowing your Django application to handle time-consuming tasks without blocking the user interface.
In this guide, we’ll walk through the process of integrating Celery with RabbitMQ to create asynchronous tasks in Django.
Introduction to Asynchronous Task Processing
Asynchronous task processing involves executing tasks independently of the main application flow. Instead of making users wait for tasks like sending emails, processing large datasets, or performing complex calculations to complete, asynchronous processing delegates these tasks to background workers, freeing up resources and improving the overall performance of the application.
Prerequisites
Before diving into the integration process, make sure you have the following components installed:
- Python
- Docker
Step 1: Create a new Django Project
First, we have to create a simple Django project with the name celery_demo. To do so follow these steps:
1. Create a new directory with the name celery_demo with the below command
> mkdir celery_demo
> cd celery_demo
2. Create a virtual environment with the following command and activate it.
> python -m venv .demo
> .demo\Scripts\activate
3. Install necessary Django and Celery packages
> pip install django celery
4. If you are running this project with celery 4+ in the Windows Operating System, then you also need to install package gevent. Otherwise, you will not see the output of celery tasks.
> pip install gevent
5. Create a new Django project celery_demo and app myapp with the below command:
> django-admin startproject celery_demo .
> python manage.py startapp myapp
Step 2: Activate myapp in the newly created project
We have created a project and app. The second step is to activate the app in the project. Follow the below steps to activate the myapp in celery_demo project:
1. Open celery_demo\settings.py and add the following entry in INSTALLED_APPS:
# celery_demo\settings.py

INSTALLED_APPS = [
    'django.contrib.admin',
    'django.contrib.auth',
    'django.contrib.contenttypes',
    'django.contrib.sessions',
    'django.contrib.messages',
    'django.contrib.staticfiles',
    'myapp.apps.MyappConfig', # new entry
]
2. Create URL routing in celery_demo\urls.py for myapp:
# celery_demo\urls.py

from django.contrib import admin
from django.urls import path, include # new

urlpatterns = [
    path('admin/', admin.site.urls),
    path('', include('myapp.urls')), # new
]
3. In myapp\views.py copy and paste below code:
# myapp\views.py

from django.http import HttpResponse

def index(request):
    return HttpResponse('Hello, World!')
4. Create a new file urls.py in myapp app and add the below code to it.
# myapp\urls.py

from django.urls import path
from .views import index

urlpatterns = [
    path('', index, name='index'),
]
5. Test the project by running the below command:
> python manage.py runserver
Open http://127.0.0.1:8000/ in your browser. If you see Hello, World then congratulations. Your project is ready for the next step.
Step 3: Using Celery and RabbitMQ
Celery communicates using messages and relies on a message broker to facilitate communication between different parts of the system, like clients and workers. There are various choices for a message broker with Celery. For instance, you can use key/value stores like Redis, or opt for a dedicated message broker like RabbitMQ.
RabbitMQ stands out as the most commonly used message broker. It’s equipped to handle various messaging protocols, including the Advanced Message Queuing Protocol (AMQP), making it the preferred choice for Celery. RabbitMQ is known for being lightweight, simple to set up, and adaptable for handling large amounts of data and ensuring continuous availability.
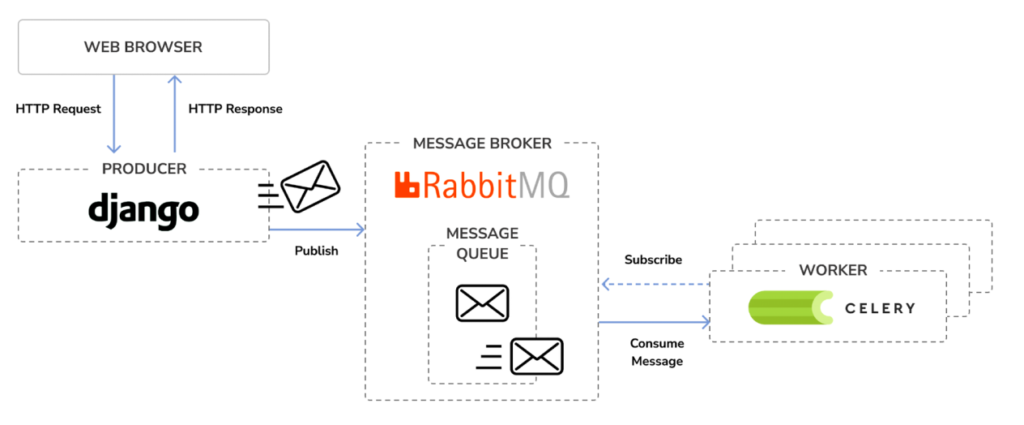
Source: Image taken from book Django 4 By Example 4th Edition, Antonio Mele Bob Belderbos
1. Install RabbitMQ in the Docker
Install RabbitMQ in Docker by running the below command terminal:
> docker pull rabbitmq
This will download the RabbitMQ Docker image to your local machine.
Execute the following command in the shell to start the RabbitMQ server with Docker:
> docker run -it --rm --name rabbitmq -p 5672:5672 -p 15672:15672 rabbitmq:management
2. Add Celery to your project
Create a new file celery.py in the celery_demo project. This file will contain the Celery configuration for your project. Add the following code to it:
# celery_demo\celery.py

import os
from celery import Celery

os.environ.setdefault('DJANGO_SETTINGS_MODULE', 'celery_demo.settings')
app = Celery('celery_demo')
app.config_from_object('django.conf:settings', namespace='CELERY')
app.autodiscover_tasks()
You need to import the celery module in the celery_demo\__init__.py file of your project to ensure it is loaded when Django starts. Add the below code in the __init__.py file.
from .celery import app as celery_app

__all__ = ['celery_app']
The next step is to add a Celery broker and back to store the result. Add the below code at celery_demo\settings.py.
# celery_demo\settings.py

CELERY_BROKER_URL = 'pyamqp://guest:guest@localhost//'
CELERY_RESULT_BACKEND = 'rpc://'
You have added Celery to the Django project, and you can now start using it.
3. Adding asynchronous tasks to your application
Please create a new file inside the myapp application and name it tasks.py. This is the place where Celery will look for asynchronous tasks. Add the following code to it:
# myapp\tasks.py

from celery import shared_task

@shared_task
def add(a, b):
    return a + b
Now you have to add the task to your index view. Edit the views.py file and update the code as shown below:
# myapp\views.py

from django.http import HttpResponse
from .tasks import add

def index(request):
    answer = add.delay(4, 10)
    return HttpResponse(f'Addition is {answer.get()}')
Make sure RabbitMQ is running in a separate terminal. Then, start the Celery worker process with the following command in a different terminal:
Note: Make sure you activate the virtual environment .demo
> celery -A celery_demo worker -l info
If you are running this project using Celery 4+ version in Windows OS then run the below command
> celery -A celery_demo worker -l info -P gevent
Run the Django project (make sure you have activated .demo virtual environment) in a separate terminal:
> python manage.py runserver
Open http://127.0.0.1:8000/ in your browser. You will see the below message on the page.
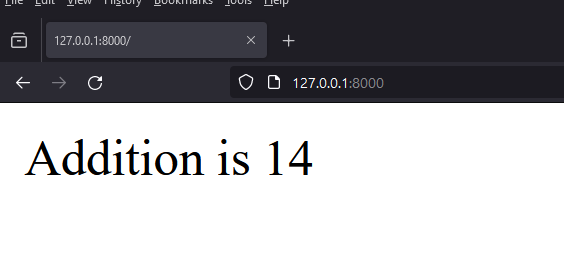
Congratulation! You have run your first celery task in Django with RabbitMQ.
Conclusion
In this blog, we’ve covered the integration of Celery with RabbitMQ to create asynchronous tasks in Django. You can use this blog to add more functions by offloading time-consuming tasks to background workers, you can improve the responsiveness and scalability of your Django applications. Asynchronous task processing with Celery and RabbitMQ is a powerful tool for optimizing performance and delivering a smooth user experience.