Python packages are a fundamental part of the Python ecosystem, allowing developers to organize and distribute their code effectively.
In this blog, we’ll walk through the process of creating a Python package using setup.py, the standard way to define metadata about your package and its dependencies.
Prerequisites
Before we start, ensure you have Python installed on your system. You’ll also need a text editor or an Integrated Development Environment (IDE) of your choice. We will be using VS Code for this tutorial.
Step 1: Organize Your Project Structure
We will be going to create a simple calculator project. In this calculator project, we will create simple operations like addition, subtraction, multiplication, and division. For this project, a package structure will be like below:
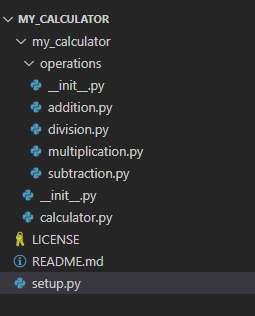
- MY_CALCULATOR/: The root directory of your package.
- MY_CALCULATOR/my_calculator/: The Python package directory.
- my_calculator/__init__.py: This file makes the directory a Python package.
- my_calculator/calculator.py: Python modules containing your calculator code to call mathematical operations.
- MY_CALCULATOR/my_calculator/operations/: Directory where all necessary operations code file is written.
- MY_CALCULATOR/my_calculator/operations/__init__.py: This file makes the directory a Python package.
- MY_CALCULATOR/my_calculator/operations/addition.py, subtraction.py, multiplication.py, division.py: Files where basic operations code is written.
- MY_CALCULATOR/setup.py: The script to package your Python code.
- MY_CALCULATOR/README.md: Documentation for your package.
- MY_CALCULATOR/LICENSE: License for your package.
Step 2: Write Your Package Code
Inside the my_calculator directory, write the Python modules containing your code. These modules will define the functionality of our calculator package.
Add below code in my_calculator/calculator.py file:
# my_calculator/calculator.py
from .operations.addition import add
from .operations.subtraction import sub
from .operations.multiplication import mul
from .operations.division import div


def calculation(a, b, operator):
    if operator == '+':
        return add(a, b)
    if operator == '-':
        return sub(a, b)
    if operator == '*':
        return mul(a, b)
    if operator == '/':
        return div(a, b)
Next, add the below code in the my_calculator/__init__.py file:
# my_calculator/__init__.py

from .calculator import calculation
Now we have to write the necessary code for our calculator’s basic operation. We are defining addition, subtraction, multiplication, and division. The code is given below for each file. Copy and paste code in a given file.
Code for my_calculator/operations/addition.py file:
# operations/addition.py

def add(a, b):
    return a + b
Code for my_calculator/operations/subtraction.py file:
# operations/subtraction.py

def sub(a, b):
    return a - b
Code for my_calculator/operations/multiplication.py file:
# operations/multiplication.py

def mul(a, b):
    return a * b
Code for my_calculator/operations/division.py file:
# operations/division.py

def div(a, b):
    if b == 0:
        raise ZeroDivisionError
    return a/b
Step 3: Create setup.py
Now, create a setup.py file in the root directory of your project (my_calculator). This file contains metadata about your package, such as its name, version, and dependencies. Copy and paste the below code in your setup.py file.
# MY_CALCULATOR/setup.py

from setuptools import setup, find_packages

setup(
    name='my_calculator',
    version='0.0.1',
    packages=find_packages()
)
In this example:
- name: The name of your package.
- version: The version of your package.
- packages: Automatically find packages in the project directory.
Step 4: Write Documentation (README.md) and LICENSE file.
Write a README file (README.md) describing your package, its purpose, and how to use it.
Add a LICENSE file to add a license for your package.
Step 5: Install and Test Your Package Locally
Before distributing your package, it’s a good idea to test it locally. You can do this by installing your package in development mode:
Create a new virtual environment in the root directory and then activate it with the below command:
python -m venv .vnev
.vnev\Scripts\activate
Then run the below command to install your package in the currently activated virtual environment .vnev.
pip install -e .
This will install your package in development mode, allowing you to make changes to the code without re-installing the package.
Note: Make sure you are in the root directory MY_CALCULATOR\ before running the above command.
Step 6: Test your package
We have to check if our newly created package is installed or not. To do so run the command in command prompt pip list. This command will list all installed packages for Python as shown in the below image.
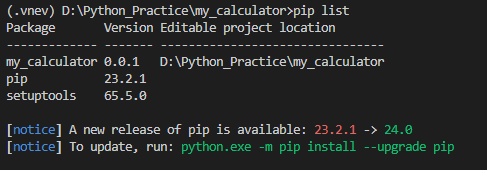
Find my_calculator in this list. If you find your package then congratulations, your package is installed successfully.
Next, create file main.py in the root directory MY_CALCULATOR\. Copy and paste the below code to test.py.
# MY_CALCULATOR/main.py

from my_calculator import calculation

print(calculation(10, 8, '*'))

# output
# 80
After running the above code, you will see 80 in your console which is the correct answer for your given input.
Step 7: Distribute Your Package
Once you’ve finished making your package, you can either share it with others directly or upload it to the Python Package Index (PyPI) for everyone to access.
To create your package on your own computer, you’ll need to open your terminal or command prompt and enter a specific command:
Note: Before you run this command, make sure to deactivate any active virtual environment by typing deactivate.
python setup.py sdist bdist_wheel
Running this command will generate some new folders named ‘build‘ and ‘dist‘. The package you’ve created will be located in the ‘dist‘ folder, typically with a name ending in ‘.whl‘. You can share this package file with others for installation using the pip command.
To distribute your package to PyPI, you’ll need to create an account on PyPI and follow their instructions for uploading packages.
Conclusion
Creating a Python package using setup.py is a straightforward process that allows you to organize and distribute your code effectively. By following the steps outlined in this guide, you can create your own Python packages and share them with others in the Python community.