In this tutorial, you will learn how to add pagination to your Django application. Pagination is a useful technique that allows you to split your data into multiple pages, with buttons like First, Previous, Next, and Last to navigate through the pages.
This is particularly helpful when displaying long lists of data or blog posts, as it makes it easier for users to browse through the content. With pagination, users can quickly find the information they need without having to scroll through a long page.
Step 1: Import Paginator Library
To get started, create a new Django project named paginate. If you are unsure of how to create a new project, you can refer to How to Create Hello World Website App in Django.
For using the Paginator class in Django, you will need to import it from the django.core.paginator module. This class allows you to easily split your data into multiple pages and provides helpful methods for navigating through the pages. To use the Paginator class in your views.py file, you can simply import it using the following code:
from django.core.paginator import Paginator
By importing the Paginator class, you can access its methods and create paginated views for your Django application.
Step 2: Using Paginator Class in View
In the following example, we will be working with a blog website that has a Blog model. Our goal is to display the titles of the most recently added blog posts. To achieve this, we will be using the IndexView class-based view (CBV). To implement this view in your Django application, simply copy and paste the code provided below into your views.py file.
from django.shortcuts import render
from django.views.generic import ListView
from .models import Blog
from django.core.paginator import Paginator

class IndexView(ListView):
    # We want to display 5 blogs in single page
    paginate_by = 5

    def get(self, request):
        context_dict = {}

        # Get blog titles
        recently_added = Blog.objects.order_by('title')

        # Create paginator of recently_added data
        paginator = Paginator(recently_added, self.paginate_by)
        page_number = request.GET.get('page')
        recently_added = paginator.get_page(page_number)

        context_dict['recently_added'] = recently_added

        return render(request, "index.html", context=context_dict)
Step 3: Add Code in index.html file
To display the titles of our blog posts with pagination, we need to create an HTML file that will render our data. To do this, you can create an index.html file in your project’s templates directory and copy the following code into it.
This HTML code will work with the views.py code provided in the previous step, allowing you to display your blog post titles with pagination.
<!DOCTYPE html>
<html lang="en">
<head>
	<meta charset="UTF-8">
	<meta name="viewport" content="width=device-width, initial-scale=1.0">
	<title>Paginator in Django Project Example</title>
</head>
<body>

    <div class="container">
        <h1>Blog Titles</h1>
        <div class="recently-added-items">
            {% if recently_added %}
                {% for post in recently_added %}
                    <h3>{{ post.title }}</h3>
                {% endfor %}
            {% endif %}

            <div class="pagination">
                <div class="left-navigation">
                    {% if recently_added.has_previous %}
                        <a href="?page=1">« First</a>
                        <a href="?page={{ recently_added.previous_page_number }}">Previous</a>
                    {% endif %}
                </div>

                <div class="center-navigation">
                    Page {{ recently_added.number }} of {{ recently_added.paginator.num_pages }}
                </div>

                <div class="right-navigation">
                    {% if recently_added.has_next %}
                        <a href="?page={{ recently_added.next_page_number }}">Next</a>
                        <a href="?page={{ party_list.paginator.num_pages }}">Last »</a>
                    {% endif %}
                </div>
            </div>
        </div>
    </div>
</body>
</html>
Step 4: Add Some CSS (Optional)
Although the code provided above will run successfully, the resulting output will look plain and unappealing. To improve the look and feel of the web page, we can apply some CSS styles. The following CSS code can be used to enhance the visual appearance of the webpage and make it more attractive to users.
Adding CSS styles to your paginated views, you have two options. You can either create a separate static CSS file and link to it in your HTML code, or you can copy and paste the CSS code directly into the section of your index.html file. Copy and paste the below code into index.html.
.container {
    width: 800px;
    margin: auto;
    border: 1px solid #000;
    padding: 5px;
}

.recently-added-items {
    display: flex;
    flex-direction: column;
}

.recently-added-items h3 {
    padding: 10px 5px;
    border: 2px solid #0069d9;

}

/*Navigation Design*/
.pagination {
    margin-top: 10px;
    width: 100%;
    display: flex;
    gap: 10px;
}

.left-navigation, .center-navigation, .right-navigation {
    flex: 33.33%
}

.left-navigation {
    text-align: left;
}

.center-navigation {
    text-align: center;
}

.right-navigation {
    text-align: right;
}

.left-navigation a, .right-navigation a {
    padding: 5px 20px;
    margin: 5px 5px;
    text-decoration: none;
    color: #fff;
    background-color: #0069d9;
    border-radius: 4px;
    font-weight: bold;
    transition: 0.2s ease-in;
    opacity: 0.8;
}

.left-navigation a:hover, .right-navigation a:hover {
    opacity: 1;
}

.center-navigation {
    margin: 5px 5px;
    color: #0069d9;
    font-weight: bold;
}
/*Navigation Design End*/
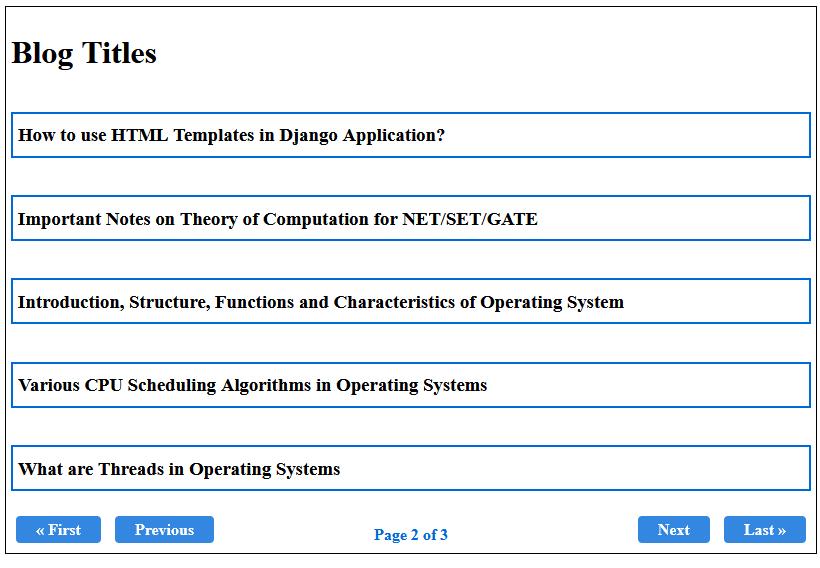
Step 5: Result of the Above Code
After running your Django application by opening the URL http://127.0.0.1:8000/, you will see a webpage that looks similar to the image shown below.


