
Do you want to learn how to use Python Scrapy Shell effectively? This complete tutorial will help you to understand everything about Scrapy Shell. So, let’s begin!
Scrapy, the powerful Python web scraping framework, offers a versatile tool called the Scrapy Shell, which simplifies the process of extracting data from websites.
Table of Contents
- What is Scrapy Shell?
- Setting up Scrapy Shell
- Navigating Websites with Scrapy Shell
- Extracting Data with Selectors
- Handling Forms and Interactions
- Best Practices and Tips
- Conclusion
What is Scrapy Shell?
Scrapy Shell is an essential part of the Scrapy framework, designed to enable the process of web scraping by providing an interactive environment for developers. It offers a convenient way to explore websites, experiment with XPath or CSS selectors, and inspect HTTP responses in real time.
Scrapy Shell empowers developers to interact with websites like a user would, enabling them to understand the website’s structure and the arrangement of data they wish to extract.
The key features of Scrapy Shell are:
- Interactive Console: Scrapy Shell operates as an interactive console, allowing developers to enter commands and see instant results. This feature simplifies the process of experimenting with different selectors and inspecting the response data.
- XPath and CSS Selectors: It supports both XPath and CSS selectors, which are essential tools for pinpointing specific elements on a webpage. Developers can use these selectors to navigate the HTML structure and extract desired data effectively.
- HTTP Requests and Responses: Scrapy Shell enables developers to make HTTP requests directly from the console and observe the responses. This capability allows for quick testing of URLs and exploring website behavior.
- Debugging and Testing: It serves as a valuable tool for debugging web scraping code. By interacting with the website in real time, developers can identify issues and fine-tune their scraping logic before implementing it in a full-fledged spider.
- Rapid Prototyping: Scrapy Shell is ideal for rapid prototyping and proof-of-concept development. Developers can quickly experiment with different scraping strategies and evaluate the feasibility of extracting data from various websites.
- Enhanced Learning: For newcomers to web scraping or Scrapy, the interactive nature of Scrapy Shell can accelerate the learning process. Developers can gain hands-on experience and familiarize themselves with Scrapy’s capabilities in a controlled environment.
Setting up Scrapy Shell
Before you can start using Scrapy Shell, you need to ensure that Scrapy is installed on your system. Here’s a step-by-step guide to setting up Scrapy Shell:
Step 1: Install Python
Firstly, ensure that you have Python installed on your computer. Scrapy requires Python 3.6 or higher. You can download the latest version of Python from the official Python website (https://www.python.org/downloads/) and follow the installation instructions for your operating system.
Step 2: Install Scrapy
Once you have Python installed, you can proceed to install Scrapy. Open your command prompt (Windows) or terminal (macOS and Linux) and run the following command:
pip install scrapy
This command will fetch Scrapy from the Python Package Index (PyPI) and install it on your system.
Step 3: Verify the Installation
After the installation is complete, you can verify that Scrapy is installed correctly by running the following command:
scrapy version
This command will display the installed Scrapy version, confirming that the installation was successful.
Step 4: Create a New Scrapy Project (Optional)
If you are starting a new web scraping project, you can create a new Scrapy project using the following command:
scrapy startproject project_name
Replace project_name with your desired project name. This command will create a new directory with the specified project name and the necessary Scrapy project structure.
Step 5: Launch Scrapy Shell
With Scrapy installed, you can now launch the Scrapy Shell for any website you want to scrape. To enter the Scrapy Shell, run the following command:
scrapy shell "URL"
Replace “URL” with the URL of the website you want to explore and scrape. Scrapy will fetch the website and open an interactive console, giving you direct access to the website’s content and structure.
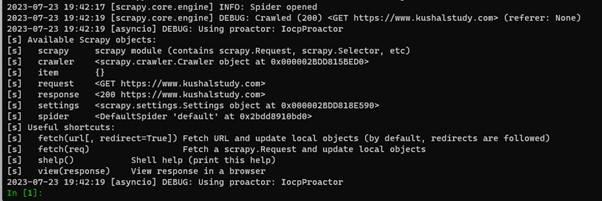
For example, if you want to fetch the website https://www.vpktechnologies.com/ then the command will be:
scrapy shell https://www.vpktechnologies.com/
This command will start Scrapy shell and fetch the given website. The result will be similar to the below image.
To fetch a website using Scrapy with the USER_AGENT, use the following command in the terminal.
scrapy shell -s USER_AGENT='custom user agent' 'https://www.vpktechnologies.com'
You have to substitute the custom user agent with a user-agent string you have.
Navigating Websites with Scrapy Shell
Scrapy Shell not only provides an interactive console for testing selectors but also allows you to navigate websites and make HTTP requests directly from the console. This functionality enables you to explore different pages on the website and gain a comprehensive understanding of its structure.
A step-by-step guide to navigating websites with Scrapy Shell:
Step 1: Examining the HTML Content:
To view the HTML content of the webpage, you can use the following command in the Scrapy Shell:
response.body
This command will display the raw HTML content of the webpage in the console, as shown in the below image.
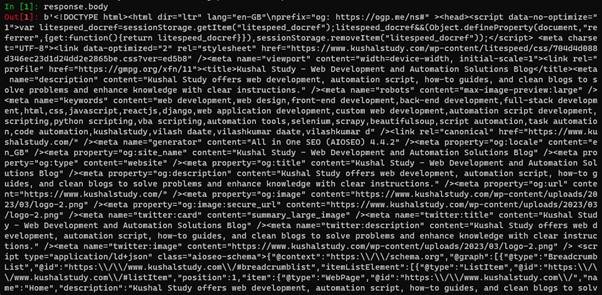
You can use this information to identify relevant elements and plan your web scraping strategy.
Step 2: Making Additional HTTP Requests
Scrapy Shell allows you to make additional HTTP requests to explore other pages on the website. For example, you may need to follow links to access different sections or subpages of the website.
To make a new request, you can use the fetch function with the desired URL as an argument. For example, if you want to fetch About Us page, then the command will be:
fetch("https://www.vpktechnologies.com/")
This command will fetch the content of the About Us page from a given website and store it in a new response object, allowing you to interact with the new page.
Step 3: End the Scrapy Shell Session
To exit the Scrapy Shell and return to the command prompt or terminal, use the exit() command or press Ctrl + D (for macOS and Linux) or Ctrl + Z (for Windows).
Extracting Data with Selectors
After navigating to the desired webpage using the Scrapy Shell, the next step is to extract specific data from the HTML content. Scrapy provides two types of selectors: XPath and CSS selectors. These powerful tools allow you to target and retrieve specific elements or information from the webpage.
A step-by-step guide to extracting data with selectors in Scrapy Shell:
Step 1: Launch the Scrapy Shell
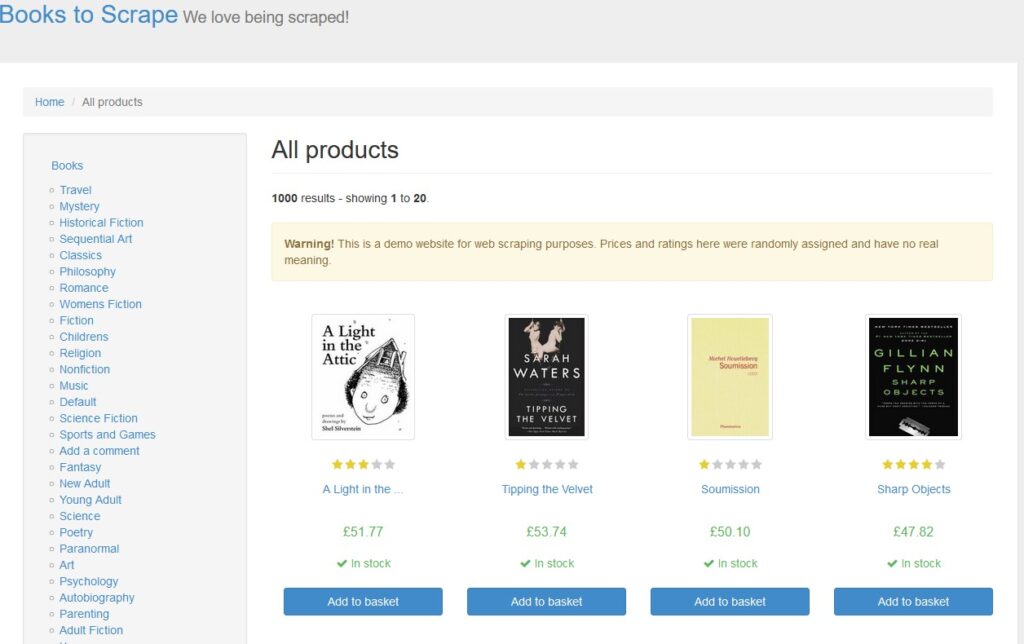
To begin, make sure you have launched the Scrapy Shell by following the steps outlined in Step 3. We will be going to scrape contents from https://books.toscrape.com/.
Open Scrapy shell and navigate to this URL with the below command:
scrapy shell https://books.toscrape.com/
Step 2: View the HTML Content
Upon launching the Scrapy Shell, the response of the initial URL you specified will be fetched and available in the response object. Use the response.body command to view the raw HTML content of the webpage and understand its structure. We are only interested in scraping book details like book titles, prices, and URLs. The HTML code for these fields is:
<article class="product_pod">
  <div class="image_container">
	<a href="catalogue/a-light-in-the-attic_1000/index.html"><img src="media/cache/2c/da/2cdad67c44b002e7ead0cc35693c0e8b.jpg" alt="A Light in the Attic" class="thumbnail"></a>
  </div>
  <p class="star-rating Three">
	<i class="icon-star"></i>
	<i class="icon-star"></i>
	<i class="icon-star"></i>
	<i class="icon-star"></i>
	<i class="icon-star"></i>
  </p>
  <h3><a href="catalogue/a-light-in-the-attic_1000/index.html" title="A Light in the Attic">A Light in the ...</a></h3>
  <div class="product_price">
	<p class="price_color">£51.77</p>
	<p class="instock availability">
	  <i class="icon-ok"></i>
	  In stock
	</p>
	<form>
	  <button type="submit" class="btn btn-primary btn-block" data-loading-text="Adding...">Add to basket</button>
	</form>
  </div>
</article>
</li>
The provided code snippet represents only a fraction of the entire HTML markup present on the source page. When selecting data and content from the page, you have the flexibility to make the scope as broad or as specific as needed.
Step 3: Using XPath and CSS Selectors
XPath selectors are an XML-based language for selecting nodes from an XML or HTML document. With Scrapy Shell, you can use XPath expressions to target specific elements on the webpage. For example:
response.xpath("//h1")
The CSS selectors, on the other hand, are similar to the selectors used in CSS styling. They provide a concise way to target elements on a webpage. In Scrapy Shell, you can use CSS selectors by using the css() method. For example:
response.css("h1")
Query The Response
To obtain the complete code snippet mentioned earlier, we can use XPath and CSS in the following manner.
With XPath
In [1]: response.xpath('//article[@class="product_pod"]')

With CSS
In [1]: response.css('article.product_pod')

Out[1]:
[<Selector query='//article[@class="product_pod"]' data='<article class="product_pod">\n       ...'>,
 <Selector query='//article[@class="product_pod"]' data='<article class="product_pod">\n       ...'>,
 <Selector query='//article[@class="product_pod"]' data='<article class="product_pod">\n       ...'>,
Selector Methods
After obtaining a Selector object, you can employ a variety of methods to extract data from it. These methods include .get(), .getall(), .re_first(), and .re(). Additionally, you can use the .attrib property to access the values of attributes present in the source.
.get() vs .getall()
Among the selector object’s methods, the two most frequently used are .get() and .getall(). The .get() method allows you to extract the contents of the first selector object, even when multiple objects are returned from either the .xpath() or the .css() query.
.get()
With XPath
In [2]: response.xpath('//article[@class="product_pod"]/h3/a').get()

With CSS
In [2]: response.css('article.product_pod h3 a').get()

Out[2]: '<a href="catalogue/a-light-in-the-attic_1000/index.html" title="A Light in the Attic">A Light in the ...</a>'
.getall()
With XPath
In [3]: response.xpath('//article[@class="product_pod"]/h3/a').getall()

With CSS
In [3]: response.css('article.product_pod h3 a').getall()

Out[3]:
['<a href="catalogue/a-light-in-the-attic_1000/index.html" title="A Light in the Attic">A Light in the ...</a>',
 '<a href="catalogue/tipping-the-velvet_999/index.html" title="Tipping the Velvet">Tipping the Velvet</a>',
 '<a href="catalogue/soumission_998/index.html" title="Soumission">Soumission</a>',
---rest of response---
.re()
The .re() method is useful to extract data using regular expressions.
With XPath
In [4]: response.xpath('//article[@class="product_pod"]/h3/a').re(r'[A-Z][a-z]*')

With CSS
In [4]: response.css('article.product_pod h3 a').re(r'[A-Z][a-z]*')

Out[4]:
['A', 'Light', 'Attic', 'A', 'Light', 'Tipping', 'Velvet', 'Tipping', 'Velvet', 'Soumission', …(rest of element)]
.re_first()
The .re_first() method performs the same function as .re(), but it only returns the first match found by the regular expression.
With XPath
In [5]: response.xpath('//article[@class="product_pod"]/h3/a').re_first(r'[A-Z][a-z]*')

With CSS
In [5]: response.css('article.product_pod h3 a').re_first(r'[A-Z][a-z]*')

Out[5]: 'A'
Selecting Specific Elements
By combining .css() queries, .xpath() queries, and various applications of .get() and .getall(), you have the ability to retrieve any specific element from the page at your convenience. For instance, here is an example of using XPath and CSS with list indexing to obtain each individual link.
With XPath
In [6]: response.xpath('//article[@class="product_pod"]/h3/a')[0]

With CSS
In [6]: response.css('article.product_pod h3 a')[0]

Out[6]: <Selector query='//article[@class="product_pod"]/h3/a' data='<a href="catalogue/a-light-in-the-att...'>
Step 4: Refining Selectors
In most cases, you’ll need to refine your selectors to pinpoint the exact data you want to extract. You can combine selectors, use attributes, or add conditions to achieve this. When constructing the XPath/CSS queries, you can use the text() node specifier. All items in the DOM are a node, even text. To specify a text node you use text(). Let’s see some examples.
With XPath
In [7]: response.xpath('//article[@class="product_pod"]/h3/a/text()')

With CSS
In [7]: response.css('article.product_pod h3 a::text')

Out[7]:
[<Selector query='//article[@class="product_pod"]/h3/a/text()' data='A Light in the ...'>,
 <Selector query='//article[@class="product_pod"]/h3/a/text()' data='Tipping the Velvet'>,
 <Selector query='//article[@class="product_pod"]/h3/a/text()' data='Soumission'>,
 <Selector query='//article[@class="product_pod"]/h3/a/text()' data='Sharp Objects'>,
 <Selector query='//article[@class="product_pod"]/h3/a/text()' data='Sapiens: A Brief History ...'>,
...
]
With XPath
In [8]: response.xpath('//article[@class="product_pod"]/h3/a/text()').get()

With CSS
In [8]: response.css('article.product_pod h3 a::text').get()

Out[8]: 'A Light in the ...'
With XPath
In [9]: response.xpath('//article[@class="product_pod"]/h3/a/text()').getall()

With CSS
In [9]: response.css('article.product_pod h3 a::text').getall()

Out [9]:
['A Light in the ...',
 'Tipping the Velvet',
 'Soumission',
 'Sharp Objects',
 'Sapiens: A Brief History ...',
 'The Requiem Red',
 'The Dirty Little Secrets ...',
…
To get href attribute from <a> elements for given books is:
With XPath
In [10]: response.xpath('//article[@class="product_pod"]/h3/a/@href').getall()


With CSS
In [10]: response.css('article.product_pod h3 a::attr(href)').getall()

Out [10]:
['catalogue/a-light-in-the-attic_1000/index.html',
 'catalogue/tipping-the-velvet_999/index.html',
 'catalogue/soumission_998/index.html',
 'catalogue/sharp-objects_997/index.html',
 'catalogue/sapiens-a-brief-history-of-humankind_996/index.html',
…
]
Now, let’s scrape book details like book titles, prices, and URLs
With XPath
In [10]: titles = response.xpath('//article[@class="product_pod"]/h3/a/text()').getall()
In [11]: prices= response.xpath('//article[@class="product_pod"]/div[@class="product_price"]/p[@class="price_color"]/text()').getall()
In [12]: urls = response.xpath('//article[@class="product_pod"]/h3/a/@href').getall()

With CSS
In [10]: titles = response.css('article.product_pod h3 a::text').getall()
In [11]: prices= response.css('article.product_pod div.product_price p.price_color::text').getall()
In [12]: urls = response.css('article.product_pod h3 a::attr(href)').getall()
Looping In the Shell
You can also use loops to get each element from a list of elements. To do so:
With XPath
In [11]: for i in response.xpath('//article[@class="product_pod"]/h3/a/text()'):
    ...:     print(i.get())
    ...:

With CSS
In [11]: for i in response.xpath('article.product_pod h3 a::text'):
    ...:     print(i.get())
    ...:

Out [11]:
A Light in the ...
Tipping the Velvet
Soumission
…
Handling Forms and Interactions
Some websites require user interactions, such as filling out forms or clicking buttons, to access certain data or perform actions. Scrapy Shell enables you to simulate these interactions, making it possible to scrape data from such websites.
A step-by-step guide to handling forms and interactions in Scrapy Shell:
Step 1: Launch the Scrapy Shell
Ensure you have launched the Scrapy Shell by following the steps outlined in Step 1.
Step 2: Locate the Form
To interact with a form on the website, first, identify the form’s HTML elements. Use the response.body command or inspect the HTML source code to locate the form’s input fields and submit button.
Step 3: Fill Out the Form
In the Scrapy Shell, use the FormRequest.from_response() method to fill out the form. This method takes the current response object and automatically fills the form’s fields with the specified data.
from scrapy.http import FormRequest

# Simulate form submission with data
formdata = {
    'username': 'your_username',
    'password': 'your_password',
}
form_request = FormRequest.from_response(response, formdata=formdata, callback=self.parse_result)
Step 4: Handling Responses
Define a callback function (self.parse_result) to handle the response after submitting the form. This function should contain the logic to process the data obtained after the form submission.
def parse_result(self, response):
    # Process the response after form submission
    # Extract and parse data from the new page
    # Continue further interactions or scraping
    pass
Step 5: Submit the Form Request
Submit the form request using the fetch() method in the Scrapy Shell. This will trigger the form submission and call the parse_result callback function to handle the response.
fetch(form_request)
Step 6: Interact with Other Pages
After submitting the form and processing the response, you can continue interacting with other pages or performing additional actions on the website, depending on the website’s behavior and requirements
Best Practices and Tips
Following these practices will help you write efficient and robust web scraping code and avoid potential issues.
- Inspect Website Structure: Before diving into web scraping, inspect the website’s HTML structure and identify the elements you want to extract. Use browser developer tools (e.g., Chrome DevTools) to understand the webpage’s layout and plan your selectors accordingly.
- Use Relative XPath/CSS Selectors: When possible, use relative XPath or CSS selectors instead of absolute ones. Relative selectors are less likely to break if the website’s structure changes, making your web scraping code more robust.
- Limit the Number of Requests: Be mindful of the number of requests you make to a website to avoid overloading their servers. Use ROBOTSTXT_OBEY in your Scrapy settings to respect the website’s robots.txt file and set a delay between requests if needed.
- Handle Errors and Exceptions: Implement error handling in your web scraping code to handle cases when selectors don’t match any elements or when HTTP requests fail. Proper error handling will prevent your script from crashing unexpectedly.
- User-Agent Rotation: To avoid being blocked by websites, rotate user agents in your requests. Use the USER_AGENT setting in Scrapy to specify different user agents for each request.
- Use Crawl-Delay: If the website has a crawl-delay specified in its robots.txt file, respect it to prevent overloading their servers.
- Avoid Continuous Scraping: Do not perform continuous scraping without permission. Respect websites’ terms of service, and consider reaching out to website owners if you plan to scrape data frequently.
- Scrape Politely: Set up appropriate delays between requests to avoid hammering a website’s server. Scraping too fast or aggressively can lead to temporary or permanent IP bans.
- Identify API Endpoints: If the website offers an API, consider using it instead of scraping the HTML. APIs are usually more reliable and designed for data retrieval.
- Obey Website’s Rules: Always respect the website’s terms of service and follow the guidelines mentioned in their robots.txt file. Scraping websites without permission can lead to legal consequences.
- Keep Your Code Clean: Write clean and organized code to improve readability and maintainability. Use comments to explain complex sections or the purpose of specific functions.
- Test on Small Samples: Test your scraping code on a small subset of data before scraping the entire website. This helps you identify and fix any issues without causing excessive load on the server.
- Stay Informed About Website Changes: Websites may change their structure or policies over time. Regularly check the website for updates that might impact your scraping code.
- Respect Privacy and Copyrights: Be cautious when scraping personal data or copyrighted information. Ensure you have permission or are legally allowed to scrape such data.
Conclusion
Congratulations! You’ve now mastered Scrapy Shell, a powerful tool for web scraping and data extraction. Armed with this knowledge, you can confidently explore and gather valuable information from websites efficiently and effectively. Happy scraping!

